
Updated 12/2/2022
Is your Lenovo laptop keyboard not working? I see many keyboard issues on laptops. Either the keyboard stops working entirely or it’s just a few keys that are the issue.
To resolve a Lenovo laptop keyboard not working issue, there are some steps to follow. We’ll need to isolate the issue to either software or hardware and then repair it from there.
Let’s get started determining the cause of the Lenovo laptop keyboard issue by following the steps below. This article is for Lenovo laptops such as Yoga, Thinkpad, and IdeaPad, but others might find it useful.
We need to isolate the problem to know why your Lenovo keyboard is not working and whether the issue is hardware or software-related.
When I was dealing with a keyboard issue on my laptop, I learned that sometimes a quick fix is as simple as restarting the computer. After doing this, I found that all of the keys were functioning properly. So, try this first, then move on to the others below.
Start here:
Boot Into The BIOS/UEFI
Can you boot into the OS and use the keyboard at all? If there is no response then try booting into the BIOS/UEFI to see if the keyboard works there.
BIOS stands for the basic input/output system and UEFI stands for the Unified Extensible Firmware Interface. These are the pre-operating system startup settings.
To Access The BIOS:
Turn on your Lenovo laptop and press the ‘F1’ key repeatedly until you enter the BIOS/UEFI menu.
If the keyboard works in the BIOS/UEFI, but not in Windows, then there is a software issue within the operating system. The next step is to try the software fixes for your keyboard not working. (See the next section)
If the keyboard does not work in the BIOS/UEFI, this indicates a hardware issue. In this case, you will need to start with the hardware fixes for your keyboard not working. (See section below)
Software Fixes For Keyboard Not Working
If your keyboard works in the BIOS but not in Windows, you know the issue is software related. Follow these steps to get your keyboard working again.
1. Boot Into Safe Mode
The first step is to try starting Windows in Safe Mode. From here you can uninstall any recently installed software that might be causing the issue.
Safe Mode is a diagnostic mode used to troubleshoot issues with Windows. The operating system loads only the essential drivers and services required for it to run.
You can also see if your keyboard works within Safe Mode; If it does it is a further indication that the software is causing the problem.
- Boot into Safe Mode by restarting your Lenovo laptop and pressing the F8 key while it is restarting.
- On the ‘Advanced Boot Options‘ screen, use the arrow keys to select the ‘Safe Mode‘ option and press enter.
- Try the Last Known Good Configuration (advanced) option which loads the last working configuration.
2. Uninstall Problem Programs
Now that you’re in Safe Mode, open the ‘Programs and Features’ panel by searching for it in the Start Menu.
Here, you can uninstall any recently installed programs that might be causing your Lenovo laptop keyboard not to work.
Tip: If the keyboard not working issue is with the operating system you’ll need to enable accessibility settings from the login screen by using the mouse. From there look at the device settings for issues. You might need to reinstall a driver.
3. Update Or Reinstall Lenovo Keyboard Drivers
Next, you need to reinstall Lenovo keyboard drivers that might have been corrupted.
To do this, open Device Manager and expand the Keyboards category. Right-click on your keyboard device and select Update Driver Software.
If there’s an update available for your keyboard driver, then follow the prompts to install it.
If there’s no update available or if updating the driver doesn’t resolve the issue, then you should try uninstalling and reinstalling the driver. To do this, right-click on your keyboard device and select Uninstall.
Restart your computer and Windows will automatically install the default keyboard driver.
Alternatively, you can go to Lenovo’s support website and download the correct driver for your laptop model.
Once the driver is downloaded, install it and restart your Lenovo laptop.
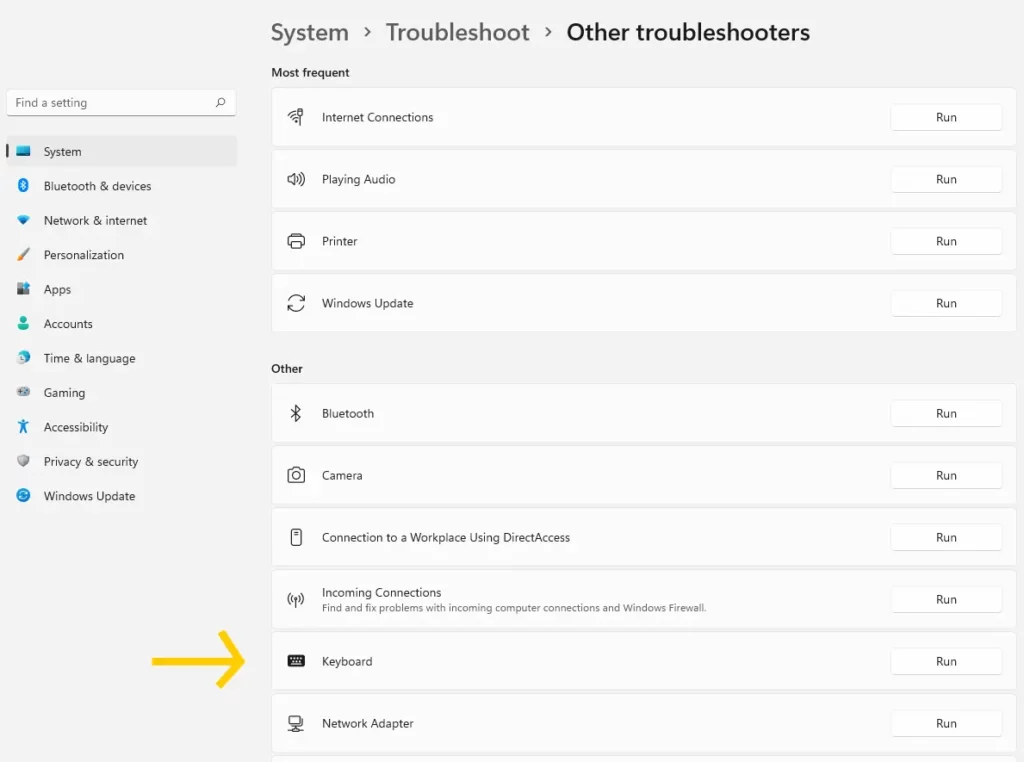
4. Run Windows 10 Keyboard Troubleshooter
Run the Windows 10 troubleshooter to resolve your keyboard not working, see the steps below:
- Click on the Windows Start Icon
- Type ‘Troubleshoot Settings” and press Enter
- Select ‘Troubleshoot’, then ‘Additional Troubleshooters’
- Find and click on ‘Keyboard’
Let the troubleshooter scan for and hopefully resolve any laptop keyboard issues it finds for your Lenovo.
The procedure for Windows 11 is very much the same. You can find the tool under ‘Settings’.
5. Update Software Drivers
If reinstalling Lenovo keyboard drivers didn’t work, you can also try updating other software drivers. Go to Lenovo’s support website and download the latest software drivers.
Update your Lenovo laptop’s graphics card, sound card, touchpad, etc.
6. Update Windows
Finally, apply the latest Windows updates to your laptop. This can be done by going to the Start Menu, selecting ‘Settings’, then ‘Update and Security’. Select ‘Check for Updates’ to see a list of available updates.
If none of the above software fixes has restored your keyboard back to a working state. A System Restore might be necessary.
7. Perform A System Restore
System Restore is a feature of Windows that will restore the operating system to an earlier date.
To perform a system restore, open the System Restore window by typing ‘system restore’ into the Start Menu search box and selecting ‘Create a Restore Point’ from the list of results.
Click on ‘System Restore’ then follow the prompts to restore your Lenovo laptop to an earlier date.
These steps should help you resolve Lenovo laptop keyboard not working issue.
Also Read: Enable Lenovo Keyboard Backlight Not Working (Easy) to help you solve any issues with your backlight not working as intended on your keyboard.
Hardware Fixes For Keyboard Not Working
If it looks like the keyboard not working issue is hardware, follow the steps below. We’ll start with the basics.
- Turn off and unplug the Lenovo laptop.
- Turn the laptop over and gently shake it to loosen and remove any dirt particles that might be stuck in the keys.
- Try blowing into and under each key or using a can of compressed air for this.
- Remove the battery and press the power button for 15 seconds.
- Reinstall the battery and power on the laptop.
1. Remove Lenovo Laptop Keyboard
This step will have you remove your keyboard and check its connections in case they have come loose.
Before you start, turn off the Lenovo laptop and disconnect all cables.
Note: Most laptop keyboards can be removed and will vary depending on the model.
Look up your model from the manufacturer for specific directions.
Several models of Lenovo laptops have replaceable keyboards, some older models had screws on the back, and newer models have screws on the front. See the hardware maintenance manual for your model.
For older Thinkpad laptops:
In general, you remove the necessary screws and slide the keyboard up and out, but know there is a cable connected to the laptop itself. You will need to disconnect/unplug this cable after lifting the keyboard out.
For newer Lenovo laptops:
It will depend on the model. You either loosen screws on the back panel that hold the keyboard in place, or you remove two screws from under the TrackPoint buttons.
In either case, slide the keyboard up and lift it out, remember to disconnect the cable that is attached. Once found, you can try removing the connector and re-inserting it.
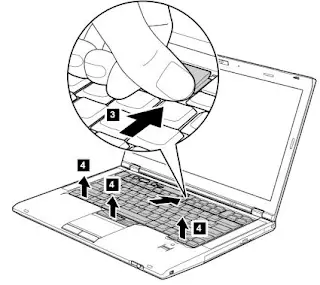
Check the cable to make sure it is securely connected. Then reinstall the keyboard.
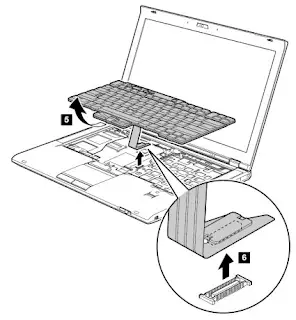
Be sure to check the manual for your specific model; see the link above.
2. Try Another Working Keyboard
If you have access to an external USB keyboard, connect it to your Lenovo laptop to see if it works. From here, you may be able to apply new driver updates, or if the keyboard is not recognized then you know it is a hardware issue.
This is just a temporary solution until you can replace the Lenovo laptop keyboard.
3. Replace Lenovo Laptop Keyboard
If you have no response from the keyboard, it might be time for a replacement.
If your Lenovo laptop is under warranty the replacement keyboard should be free of charge and either you send in the laptop or they ship the keyboard to you.
Normally you will need to send the laptop to them. See warranty lookup below. Purchasing a new laptop keyboard can run from about $60 to $100 US.
Tip: A previous article I wrote explains how to check your warranty status as well as find the right part number for your Lenovo laptop. You can read that article: How To Find Lenovo Parts.
Lenovo Laptop Keyboard Locked
If the Lenovo laptop keyboard is locked, it could be due to a driver issue or hardware issue.
Try the following to troubleshoot:
- Turn off the filter keys by pressing and holding the right shift key for 8 seconds. Alternatively, click Settings > Ease of Access > Keyboard > toggle off filter keys.
- Open the on-screen keyboard using the mouse by clicking Settings > Ease of Access > Keyboard and toggle on the on-screen keyboard.
- Re-install or update the laptop keyboard drivers using the mouse by right-clicking the Start menu > Device Manager > Keyboards > Drivers and selecting Update Driver.
- Lastly, reboot the Lenovo laptop.
Some Keys On Lenovo Laptop Keyboard Not Working
If you find that part of your laptop keyboard stopped working, or only some keys on the keyboard do not work, follow these steps:
- First, try to shut down the laptop.
- Remove the battery and let the system drain.
- Finally, reinstall and reboot.
- Run the keyboard troubleshooter shown in the steps above.
- Check for and clean out any debris under the individual keys. (As shown above)
Also for a keyboard not working, try to remove the keyboard as shown above, and check its connection to the system board. Occasionally this cable can become loose, causing odd keyboard behavior.
ALSO READ: Lenovo Touchpad Not Working |Fix It if you are having touchpad problems on your laptop.
Lenovo Laptop Keyboard Not Working – Summary
It’s usually worth investigating an issue with your Lenovo laptop keyboard not working to at least get an idea of the cause. If you do need to call the support number you can clearly identify and provide clear information to them as to what you need.
On the other hand, you might discover you are capable of the repair or can fix the Lenovo laptop keyboard yourself.
Replacing a laptop keyboard is in most cases not difficult. Review the manual for the specific laptop, remove some screws, and then the keyboard.
Remember to remove the battery and unplug the unit first. You can learn this DIY skill and save yourself time and money.

J.S. is the owner, content creator, and editor at Upgrades-and-Options.com. I’ve worked in the IT and Computer Support field for over 20 years. The server hardware in my computer labs has mostly been IBM, but I’ve supported Dell, HP, and various other hardware. In addition, as part of my lab administrator responsibilities, I’ve learned, supported, and repaired/upgraded network hardware such as Cisco routers and switches. READ FULL BIO >>
- Fix: Lenovo Keyboard Backlight Not Working
 Some users have reported issues with their Lenovo keyboard backlight not working properly. In this article, we will explore common reasons why this problem may occur and provide troubleshooting steps to help resolve it. Before We Begin: Many Lenovo laptops come configured with a backlit keyboard but not all, so it’s important to understand if your model does. In addition, … Read more
 - Top Methods for Cleaning Your Laptop Screen
 Frequently, we catch ourselves staring at our laptop screens, obscured by a haze of fingerprints and smudges. In this article, we present you with the most effective methods to restore your laptop screen to its pristine glory. THIS POST MAY CONTAIN AFFILIATE LINKS. As an Amazon Associate, I earn from qualifying purchases. PLEASE READ MY DISCLOSURE FOR MORE INFO. Understanding … Read more
 - How To Fix Second Monitor Is Not Detected
 Having trouble with Windows not detecting the second monitor? Here’s a comprehensive guide to help you resolve this issue and get your second monitor up and running smoothly. Step-by-Step Guide to Fixing ‘Second Monitor Not Detected’ Issue If your Windows PC is not detecting the second monitor, we can get it working again. Follow our comprehensive guide below to troubleshoot … Read more
 - The ‘Real’ Truth About Laptop Performance: An Unconventional Guide
 Having trouble with a slow laptop that’s about as fast as a sloth stuck in quicksand? We’re going to dive into the nitty-gritty of laptop performance, showing you how to realize your device’s full potential. From the dangers of overheating and the importance of regular updates to the pitfalls of poor user habits, we’ve got you covered. So buckle up, … Read more
 - Fixing Dell Chromebook Mouse Issues: A Step-By-Step Guide
 Experiencing problems with your Dell Chromebook mouse can be frustrating. This guide aims to streamline the process of diagnosing and resolving these issues, offering clear, concise steps tailored to both hardware and software-related problems. Whether you’re a tech enthusiast or a beginner, we’ll help you understand and rectify mouse malfunctions, ensuring your Chromebook runs smoothly. Navigating the world of modern … Read more

Comments are closed.