This article will detail the necessary equipment needed in a computer lab or server room to allow users the ability to develop and test smoothly without issue.
Ideally, we want the computer lab to be a transparent component to these end users.
What is needed for a computer lab?
Designing and building, or outfitting a new computer lab is a large task and much planning will be required by the IT team. In a previous article, I wrote about the IT Infrastructure Plan, Design and Deploy process. Refer to that guide for those steps.
This article will focus more on the actualities of moving in and setting up the new lab space.
By now you should have planned and designed the current and future requirements for the server room.
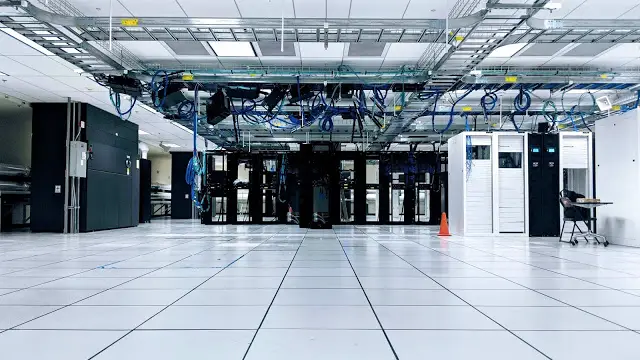
Common server rooms have raised floors, a Computer Room A/C (CRAC) Unit, return plenums back to the CRAC unit, and cable trays along the ceiling. Not to mention electrical runs under the floor tiles of either 110v or 220v(208v).
How To Design And Build A Computer Lab Step By Step
So now you have a fresh clean computer lab space, servers ready to install, racks, network gear, and cables galore. Let’s get started.
Hot Aisle, Cold Aisle:
Think about creating hot aisles and cold aisles for the equipment. Energy efficiency has become a growing concern as businesses look to be more green.
Place perforated floor tiles on the rows in front of where the server racks will be placed. If you have return plenums or ceiling perforated tiles you would place those behind the server racks.
You can imagine cold air coming from the CRAC unit under the floor, up through those perforated tiles. The servers will pull in that cold air and exhaust heated air out the back, which will go up into the plenum or ceiling to be returned back to the CRAC unit.

Server Rack Space:
- Place the server racks in their designated locations. These should be side by side in rows as shown in the diagram above.
- Next, install the servers themselves with the larger heavier ones at the bottom. If you ordered network switches for these racks, install them at the top or possibly along the sides if space has been allocated there.
- Most likely you will have power distribution units(PDU) also installed in these racks. Connect the power from the servers here and the PDU to the underfloor electrical cable run.
- Connect the network cables to the network switches, then connect these switches back to the lab’s router or main lab switch; whichever is appropriate in your setting.
- If using a keyboard, video(KVM) tray, connect it up as needed. Frequently these days administrators remotely connect to the lab’s equipment.
Network Design:
How do you build a network system?
Building your lab network should have been thought out and designed in the initial Plan, Design, Deploy stage.

Normally network switches are installed in each server rack. Either Catx or Fiber cables are run from these switches up into a cable run along the ceiling and fed back to a central point.
Namely, this point is either a lab router or main switch. The connection from the main switch or router will connect back to the site’s network gear, which should be handled by the site’s personnel.
Complete Cabling Connectivity:
- To finish out the computer lab fit-up complete all the needed connections.
- Check the network connections from each server to the switch.
- Make sure each server has been connected to the electrical PDU and double-check the power requirements placed on each PDU.
- You don’t want to overload and place too much demand on each electrical supply run.
Power up the network gear first and then power on each rack one at a time.
From this point, you’ll start working on the software side as you will need to configure all the lab equipment to fit your requirements.
TIP: When cabling behind the server racks, keep the network cabling as clean and neat as possible. It is all too easy to let this get away from you and become a big clump of a mess. It will provide better airflow but also won’t become a headache in the future when you need to track down an individual cable.
Bonus:
Utilize Lenovo’s Capacity Planner tool. This tool helps IT admins. calculate the power consumption of different server setups. It allows you to configure racks, servers, and other equipment, then compute the total power this particular setup will use.
Knowing this information before deployment can increase the efficiency of both lab space but also in the location of rack installations.
This is a very useful tool to use. Find it here: Lenovo Capacity Planner
What’s the takeaway?
Outfitting a new server lab space is a time-consuming process. Taking the necessary time in the planning phase will pay dividends later on. Once all the servers, racks, and network gear have arrived work the steps in your plan to create a successful lab space that is functional and also allows room for future growth.
What are your experiences in server lab spaces? Let me know..
READ NEXT:IT Infrastructure Plan, Design, Deploy
IT Infrastructure refers to all the related equipment that is used to support the information technology needs and services of an organization.

J.S. is the owner, content creator, and editor at Upgrades-and-Options.com. I’ve worked in the IT and Computer Support field for over 20 years. The server hardware in my computer labs has mostly been IBM, but I’ve supported Dell, HP, and various other hardware. In addition, as part of my lab administrator responsibilities, I’ve learned, supported, and repaired/upgraded network hardware such as Cisco routers and switches. READ FULL BIO >>

Comments are closed.