Updated: 12/2022
I recently was tasked with creating a Redhat kickstart server so we could install lab machines automatically across the network instead of installing each one manually with a DVD. The following are the steps I took to create an install server and the kickstart configuration file. I’m using RHEL6.1 x86_64 and Intel-based servers.
Software Requirements
This applies to RHEL6.1:
- TFTP-Server
- DHCP Server
- Xinetd
- NFS
- Syslinux
- System-config-kickstart (GUI tool to configure kickstart)
Install these packages and ensure each service (dhcp, tftp, nfs, xinetd) is running.
The ports used by these services must be enabled through the firewall, or the firewall must be disabled.
#> chkconfig iptables off
#> service iptables stop
Installation
Red Hat Kickstart Server Setup
1) Copy RHEL6.1 install media to a directory on your server-
- >Mount /mnt/cdrom
- >cp –var /mnt/cdrom/RedHat /rhel6.1
- >cp /mnt/cdrom/RELEASE-NOTES*.html /rhel6.1
2) Create NFS share that points to your install directory-
Edit /etc/exports file to look like the following:
/rhel6.1 x.x.x.x/24(rw,insecure,sync,no_root_squash) #Replace with your subnet
Run the following to export the directory:
> /usr/sbin/exports –a
3) Configure DHCP for PXE/TFTP-
Edit /etc/dhcp/dhcpd.conf to look like the following:
# DHCP Server Configuration file.
# see /usr/share/doc/dhcp*/dhcpd.conf.sample
# see ‘man 5 dhcpd.conf’
#
allow booting;
allow bootp;
subnet x.x.x.x netmask 255.255.255.0 { # Replace with your lab’s subnet
option routers x.x.x.x; # Replace with router/gateway IP
option subnet-mask 255.255.255.0;
option domain-name “domain_name.com”;
option domain-name-servers x.x.x.x;
range x.x.x.100 x.x.x.120; # Replace with range of DHCP addresses
default-lease-time 600;
}
# Redhat Kickstart
class “pxeclients” {
match if substring (option vendor-class-identifier, 0, 9) = “PXEClient”;
next-server x.x.x.x; # Replace with the TFTP Server IP
filename “linux-install/pxelinux.0”;
}
Run the following to restart the dhcp server
>service dhcpd restart
Enable xinetd and tftp-server to run at runlevels 3-5:
>Chkconfig –level 345 xinetd on # tftp is xinet based
>Service xinetd restart
4) Edit /etc/xinetd.d/tftp to look like the following:
# default: off
# description: The tftp server serves files using the trivial file transfer
# protocol. The tftp protocol is often used to boot diskless
# workstations, download configuration files to network-aware printers,
# and to start the installation process for some operating systems.
service tftp
{
disable = no
socket_type = dgram
protocol = udp
wait = yes
user = root
server = /usr/sbin/in.tftpd
server_args = -s /var/lib/tftpboot
per_source = 11
cps = 100 2
flags = IPv4
bind = x.x.x.x # Add your server’s IP address
}
5) Make directories for tftpboot-
>mkdir –p /var/lib/tftpboot/linux-install
>mkdir –p /var/lib/tftpboot/linux-install/pxelinux.cfg
>cp /usr/share/syslinux/pxelinux.0 /var/lib/tftpboot/linux-install/
>cp /usr/share/syslinux/menu.c32 /var/lib/tftpboot/linux-install/
>cp /rhel6.1/images/pxeboot/* /var/lib/tftpboot/linux-install/
>touch /var/lib/tftpboot/linux-install/pxelinux.cfg/default
Edit /var/lib/tfptboot/linux-install/pxelinux.cfg/default to look like:
default menu.c32
timeout 100
MENU TITLE PXE Redhat Network Install
Label 1
MENU LABEL xSeries Redhat Install
kernel vmlinuz
append initrd=initrd.img ksdevice=eth2 ramdisk_size=10000 #eth number you use ks=nfs:x.x.x.x:/rhel6.1/xseriesks.cfg # Location of the kickstart .cfg file wecreate next
Restart services:
>service xinetd restart
>service dhcpd restart
Red Hat Kickstart Configuration
Detailed kickstart configurator usage can be found at Redhat:
http://docs.redhat.com/docs/enUS/Red_Hat_Enterprise_Linux/6/html/Installation_Guide/ch-redhat-config-kickstart.html
System-config-kickstart is a GUI-based kickstart configuration tool to simplify creating a kickstart file that is used to automatically install remote servers.
1) To launch Kickstart Configurator, boot your system into a graphical environment, then run system-config-kickstart, or click Applications → System Tools → Kickstart on the GNOME desktop or Kickoff Application Launcher+Applications → System → Kickstart on the KDE desktop.
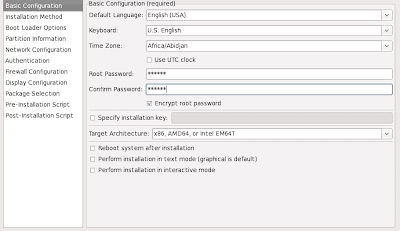
-Make the selections based on how you want to install your servers.
-The Installation Method screen allows you to choose how to install. Select NFS install and enter your server’s IP address and the directory that contains the installation source.
-Enter the partition information and network information now or, if you prefer, leave them blank and you will be prompted during the install.
-Add the packages you want installed.
-To save the kickstart file, click the Save to Filebutton in the preview window. To save the file without previewing it, select File => Save File or press Ctrl+S .
-Shown from step 5 above we saved the file as xseriesks.cfg in the /rhel6.1 directory.
That’s it. Now you’re ready to test your installation, boot a server from the network to make sure it grabs an IP and starts to install.
Also see: How to Open and Extract RAR Files from Any Device
Also Read: How To Change Directory in CMD | Command Prompt
Also Read: How To Host A Website – Beginner’s Guide
Also Read: Data Center and Server Farm Differences (helpful guide)